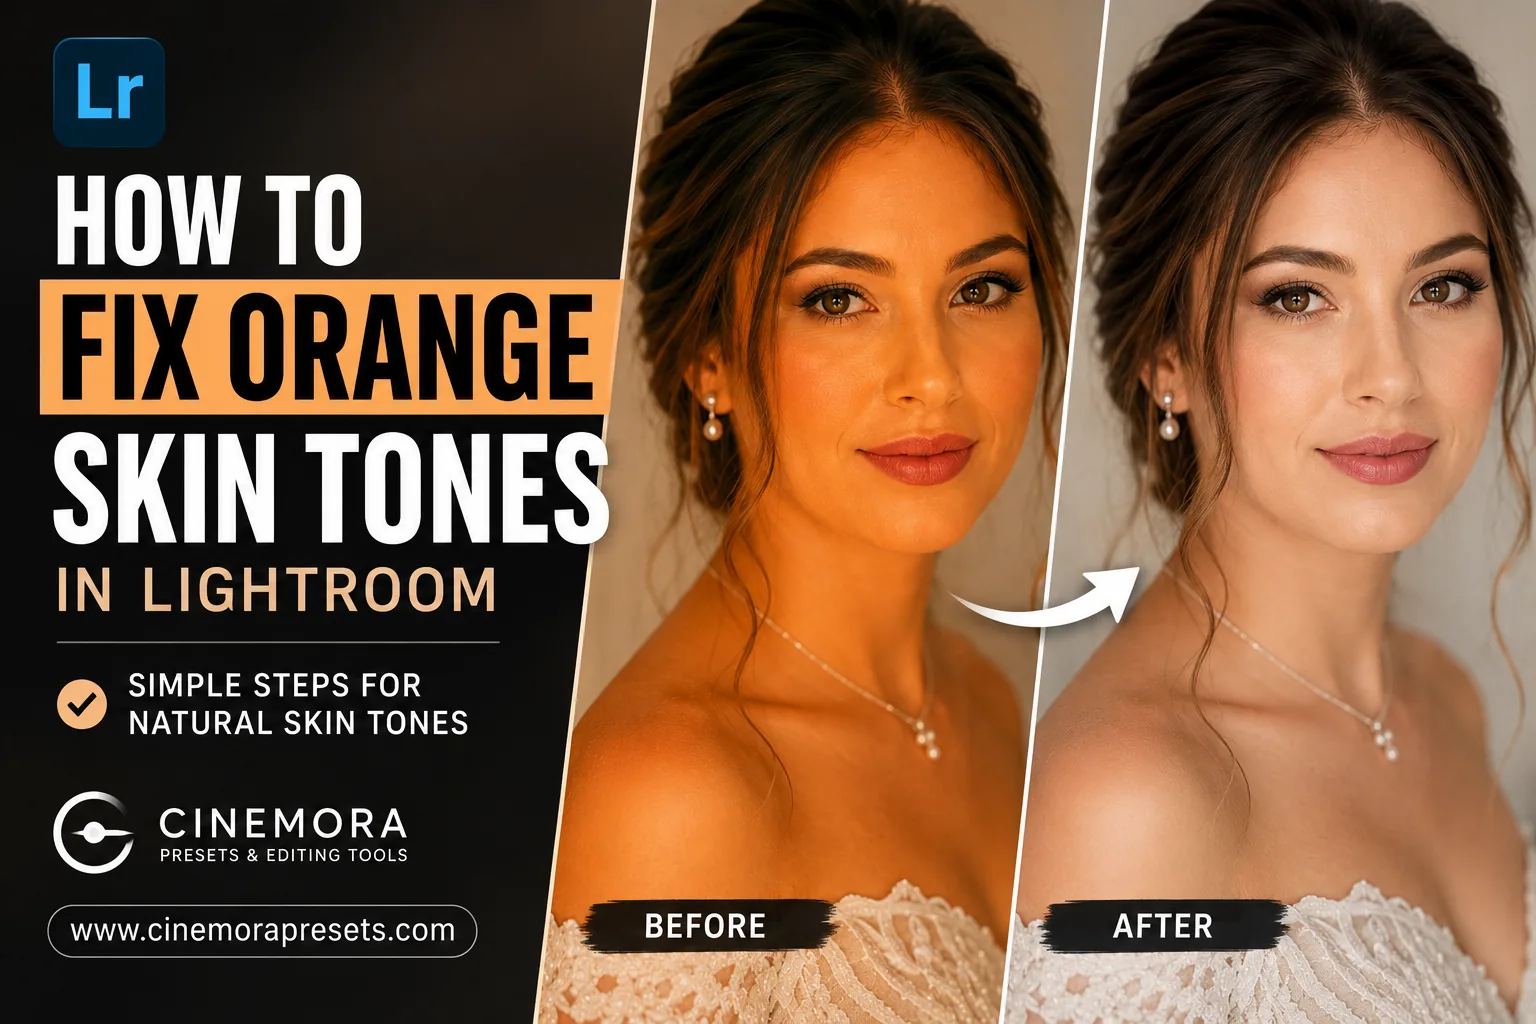
TL;DR: Orange skin in Lightroom is almost always a white balance problem first, an HSL problem second. Fix Temperature in the Basic panel before touching HSL. Then lower Orange Saturation slightly, lift Orange Luminance, and use a People mask if you want to affect only the skin without changing the rest of the photo.
Why Does Skin Look Orange in Lightroom?
Before jumping to sliders, it helps to understand what is actually going wrong.
Skin looks orange in Lightroom for a few common reasons:
Wrong white balance. This is the most common cause by far. Indoor tungsten bulbs and warm LED lights create a strong orange cast when your camera is set to daylight white balance. The result is skin that looks warm, golden, or outright orange by the time you open the file in Lightroom.
A warm preset applied on top of warm lighting. If your photo was already lit with warm light and you apply a warm preset on top of that, the orange builds up fast. The skin absorbs that warmth more visibly than any other part of the image.
Over-saturated orange channel in HSL. Presets, filters, or manual adjustments that push the orange saturation high will make skin look vivid and unnatural, even if white balance is correct.
Wrong camera profile. The profile selected in Lightroom's Color Calibration panel affects how your RAW file is read at the base level. If you want to know more about how RAW data affects your color adjustments, check out our guide on JPEG vs RAW for Lightroom Editing.
Once you know the cause, the fix is straightforward.
The Correct Order to Fix Orange Skin
This is where most people go wrong.
The instinct is to open the HSL panel and drag the Orange Saturation down. Sometimes that works. But if white balance is still off, you are layering one correction on top of another unstable correction. The result usually looks flat, gray, or just wrong in a different way.
The right order is:
- Set color profile
- Fix white balance
- Adjust exposure
- Fine-tune with HSL
- Isolate skin with a mask if needed
Follow that sequence and orange skin becomes a much easier problem to solve.
Step 1: Set the Right Color Profile
Go to the Color Calibration panel at the bottom of the Develop module right panel stack.
The Profile dropdown at the top determines how Lightroom reads your RAW file. This is the base layer. Everything else you do builds on top of it.
For portraits, Adobe Portrait or Camera Faithful tend to start more neutral than Adobe Vivid or Camera Landscape, which push saturation higher from the start.
If your skin is already orange before you touch anything, switching to Adobe Portrait here can solve a significant chunk of the problem before you even look at temperature.
Step 2: Fix White Balance First
Open the Basic panel and look at the Temperature slider.
Moving it left makes the image cooler (more blue). Moving it right makes it warmer (more orange/yellow). If skin looks too orange, the image is almost certainly running too warm.
For photos taken under indoor tungsten bulbs, you will often need to pull the Temperature slider significantly to the left, targeting 2800-3400K. If you are dealing with warm LED studio or event lighting, aim for around 3500-4500K instead. For outdoor golden hour shots, the temperature might already be close, but a small adjustment to the left helps if skin looks oversaturated. In overcast daylight, skin often looks flat and cool, so you may actually need to move the slider slightly to the right to add warmth.
If a neutral area exists in the frame (a white shirt, gray wall, or pale background) use the White Balance Eyedropper (W key in Lightroom Classic) and click it. Lightroom will set a balanced starting point that you can then refine manually.
Keep Temperature moves reasonable. Pulling it too far left will make whites go blue and the whole image will feel cold and off. Get close here, then finish the job in HSL.
Important: Fix white balance before touching HSL. Adjusting orange saturation on top of wrong white balance almost always makes things worse, not better.
Step 3: Check Exposure
Skin that is underexposed often reads darker and muddier, which can make an orange cast look more intense. Skin that is blown out loses texture and looks patchy.
Take a quick pass at Exposure, then use Highlights and Shadows to balance the tonal range. Lifting Shadows slightly brings detail back into darker skin areas without affecting the midtones where most of the color correction happens.
This is not a dramatic step. Half a stop in either direction is usually enough.
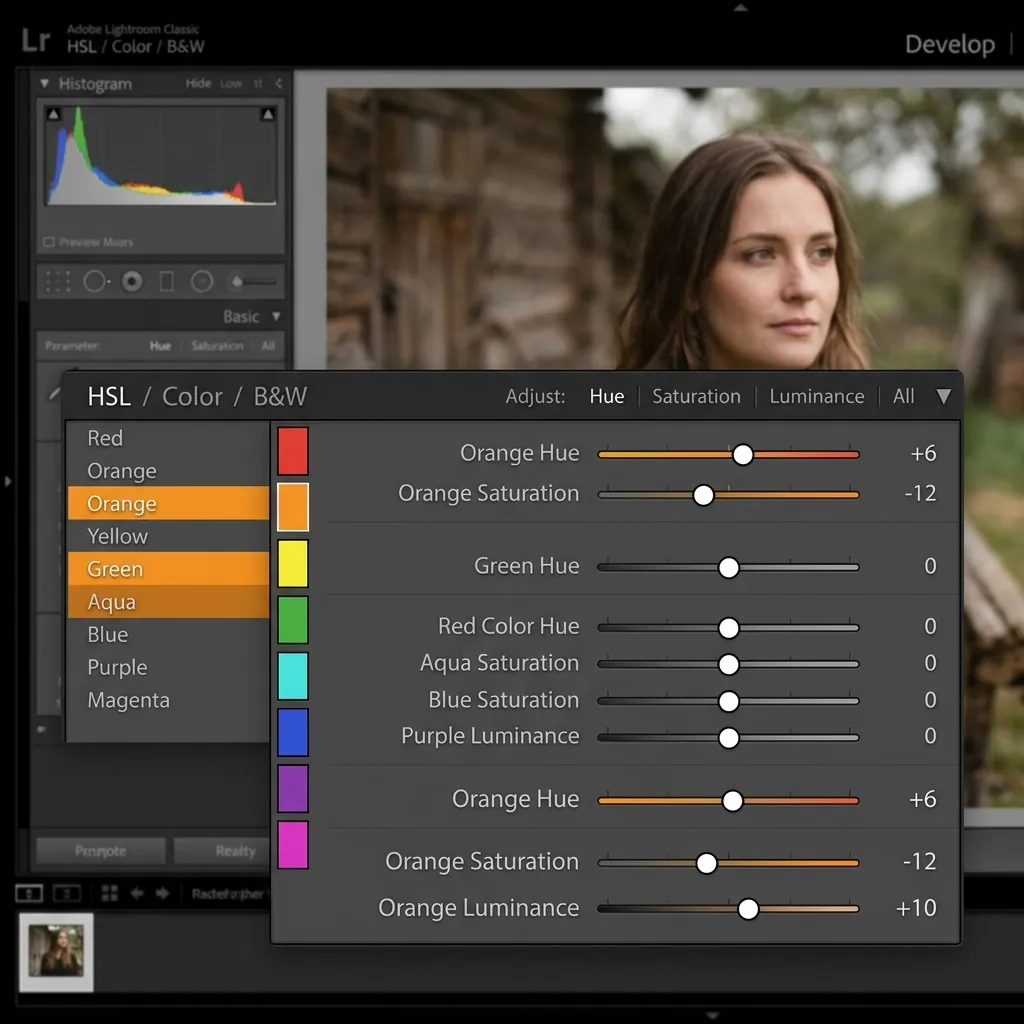
Step 4: Fix Orange Skin with the HSL Panel
Now that white balance is set correctly, open the HSL / Color Mix panel in the Develop module.
Human skin sits primarily in the Orange channel, with some overlap into Red for flushed or fair skin, and Yellow for olive or deeper skin tones.
You will work across three tabs: Hue, Saturation, and Luminance.
Hue: Change the Direction of the Color
Under the Hue tab, the Orange slider shifts whether the orange in your image leans warmer (left) or cooler and peachier (right).
If skin looks like a fake tan, shifting Orange Hue right by +3 to +8 moves it toward a peach tone that reads more natural.
The Targeted Adjustment Tool (the small dot icon at the top of the HSL panel) lets you click directly on skin in the photo and drag up or down. Lightroom automatically identifies which sliders correspond to that area and adjusts them as you drag. This is faster and more accurate than guessing sliders blindly.
Saturation: Reduce the Intensity
This is the most important slider for orange skin.
Under the Saturation tab, lower Orange Saturation to reduce how vivid and intense the orange cast appears. A value of -5 to -20 covers most situations.
Be careful not to go too far. Pulling Orange Saturation below -25 or -30 strips all warmth from the skin and it starts to look gray and lifeless. You are reducing intensity, not removing all color.
If skin looks ruddy or pink on cheeks and nose, also lower Red Saturation slightly (-3 to -12).
Luminance: Control How Bright the Skin Appears
Under the Luminance tab, raise Orange Luminance by +5 to +15 to brighten skin independently of everything else.
This is different from raising overall exposure. It lifts only the orange tones, which creates a natural glow on skin without making highlights clip or backgrounds go bright. It is especially useful after a big Temperature correction that may have made skin look slightly flat or dark.
If skin looks too bright or washed out, lower Orange Luminance instead.
Quick Reference
| Slider | Move | Typical Range | What It Does |
|---|---|---|---|
| Orange Hue | Right | +3 to +8 | Shifts toward peach, reduces fake-tan look |
| Orange Saturation | Left | -5 to -20 | Reduces orange intensity |
| Orange Luminance | Right | +5 to +15 | Brightens skin without adding warmth |
| Red Saturation | Left | -3 to -12 | Calms ruddy or flushed areas |
Keep all moves small. Adjustments of 3 to 10 points are almost always enough. Large slider moves create obvious, artificial-looking results.
Step 5: Use a Mask to Target Only Skin
Global HSL changes affect every orange and red pixel in the frame, not just skin. Warm backgrounds, autumn leaves, wooden furniture, and clothing all share those color channels.
If you want to fix skin without changing the rest of the image, use a mask.
In Lightroom Classic:
- Press Shift+W or click the Masking icon in the Develop module
- Choose Select People
- Lightroom automatically detects people in the photo
- Select the person and choose Face Skin or Body Skin
- Make your Temperature, Tint, or HSL adjustments inside the mask
- Only the masked area is affected
If the photo does not have a detectable person, use Select Subject instead and refine the edges with a brush.
In Lightroom Desktop and Mobile:
The Masking panel works the same way. Open it, choose Select People or Select Subject, and apply changes inside the mask.
This approach is especially useful for golden hour portraits where the background should stay warm but the skin is pushed too far orange.
Step 6: Lower Clarity for Portraits
This step does not fix the orange cast directly, but it matters.
High Clarity adds midtone contrast that exaggerates subtle color variation across skin. Skin naturally has small differences between blotchy, pink, and warm areas. High Clarity makes all of that more visible and makes slight orange tones look more intense than they really are.
For most portrait work, keep Clarity at 0 or slightly negative (-5 to -20 depending on how soft you want the result). This will not flatten the photo, it just removes the harshness that makes color issues harder to fix.
Fixing Orange Skin by Lighting Situation
Not every orange skin problem comes from the same cause. Here is how to approach the most common scenarios.
Indoor Tungsten or Warm LED Light
This is the most aggressive version of the problem. Tungsten bulbs sit around 2800-3200K and create a very strong orange cast against a daylight-calibrated camera.
Pull Temperature significantly left first. Then raise Orange Luminance by +10 to +15 to restore the skin brightness that a big temperature correction removes. Without that luminance lift, skin looks gray and flat after heavy cooling.
Golden Hour Outdoor Portraits
Golden hour light looks beautiful and the warmth is usually part of what makes the shot work. Do not cool the Temperature dramatically here or you will lose the mood entirely.
Instead, lower Orange Saturation by -5 to -8 just enough to take the edge off without removing the warmth. Then check Orange Luminance if skin starts to look dark.
Flash Photography
Flash can introduce orange skin in mixed lighting situations when ambient tungsten or LED light fills the shadows while flash covers the highlights. Fix the global white balance first for the flash exposure, then use a face mask to cool the skin independently in areas where ambient light is affecting the color.
Warm Preset Applied on Top of Warm Light
This is the most common trap. Reduce Orange Saturation by -10 to -15, cool Temperature slightly, and check that Orange Hue has not drifted toward red. The combination of a warm preset and warm indoor light is the most common cause of orange skin in edited photos.
Fixing Orange Skin in Lightroom Mobile
The same tools are available in Lightroom Mobile with a slightly different layout.
- Open your photo and tap Color in the bottom menu
- Tap the Color Wheel icon next to Mix to open HSL
- Tap the Orange circle
- Under Saturation, lower the Orange slider to reduce the cast
- Under Luminance, raise Orange to restore skin brightness
- Under Hue, shift Orange right slightly for a peachier tone
- Return to Light and check Temperature if the overall warmth is still too high
For selective edits on mobile, tap the Masking icon and choose Select Subject. Apply your adjustments inside the mask to target only the skin.
Are DNG Presets Causing Orange Skin?
If you applied a preset and skin suddenly went orange, the preset is likely pushing the Temperature or Orange Saturation too high for your specific lighting or skin tone. This is one of the main reasons why presets look different on every photo.
The fix is simple. After applying the preset, you should first pull the Temperature slider to the left to compensate for any added warmth. Next, lower the Orange Saturation to reduce the preset's effect on the skin specifically. Finally, raise the Orange Luminance slightly to keep the skin looking bright and healthy after the correction.
If you work with a lot of presets, building a small correction preset for skin tones that you apply on top of your main preset can save time across a full session.
Advantages of XMP vs DNG Presets for Skin Tones
Both XMP vs DNG presets can cause orange skin if the base settings are too warm. But XMP presets are generally easier to adjust and fine-tune because they sit in the Lightroom preset panel and can be customized directly.
DNG presets require copying and pasting settings, which adds an extra step every time you need to make a correction. For skin tone work where you are often tweaking on a per-image basis, XMP presets tend to give a faster and cleaner workflow.
Related Guides
- XMP vs DNG Lightroom Presets
- Why Lightroom Presets Look Different on Every Photo
- JPEG vs RAW for Lightroom Editing
Recommended Presets
Frequently Asked Questions
Why does skin look orange in Lightroom?
Skin looks orange in Lightroom most often because of incorrect white balance. Indoor tungsten and warm LED lighting create an orange cast when the camera is set to daylight white balance. Over-saturated orange channels, warm presets applied on top of warm lighting, and wrong camera profiles in the Color Calibration panel can all cause the same effect.
Which slider fixes orange skin in Lightroom?
The Orange Saturation slider in the HSL/Color Mix panel is the main fix. Lower it slightly to reduce the intensity of the orange cast. Combine it with Orange Hue shifted slightly right and Orange Luminance lifted for a complete, natural-looking correction.
Should I fix white balance or HSL first?
Always white balance first. Adjusting HSL on top of wrong white balance creates unstable color that is harder to fix and often looks gray or flat in a different way. Set Temperature and Tint in the Basic panel before touching anything in HSL.
How do I fix orange skin in Lightroom Mobile?
Go to Color > Mix, tap the Orange circle, and lower Orange Saturation. Also check Temperature in the Light panel and pull it cooler if the whole image is too warm. Use Select Subject under Masking if you want to target only the skin.
Can I fix orange skin on just the face without changing the background?
Yes. Use the Masking tool (Shift+W in Lightroom Classic) and choose Select People. Apply your Temperature, Tint, and HSL adjustments inside the mask. The background is not affected.
What causes orange skin after applying a preset?
Presets push the Temperature, Orange Saturation, or overall warmth higher than what the specific lighting in your photo needs. The fix is to lower Temperature after applying the preset, reduce Orange Saturation in HSL, and raise Orange Luminance to keep skin bright without the orange cast.
What is a good Orange Saturation value for skin in Lightroom?
There is no single correct value because it depends on the photo. A typical range when correcting orange skin is -5 to -20. Start small (-5) and increase the correction gradually until skin looks natural. Avoid going below -25 or skin will start to look gray.
Final Thoughts
Orange skin in Lightroom is one of the most common editing problems, and it is also one of the most fixable once you know the right order to approach it.
White balance comes first. HSL comes second. Masking comes in when you need precision without affecting the rest of the image.
The actual slider moves are small. A Temperature pull of a few hundred Kelvin, an Orange Saturation reduction of -5 to -15, and an Orange Luminance lift of +5 to +15 covers the vast majority of orange skin situations.
Skin tone editing does not need to be complicated. It needs to be done in the right sequence.