TL;DR: To edit dark and moody photos in Lightroom, drop your exposure, fade the shadows using the Tone Curve, desaturate greens and yellows, and add a cool teal grade to the shadows. Keep the dark elements controlled so you maintain texture in the shadows.
What Does "Dark and Moody" Mean?
Dark and moody photos use deep shadows, soft colors, and strong contrast to create a feeling. Instead of making everything bright, you pull light away on purpose. This makes the photo feel calm, dramatic, or even a little mysterious.
You see this look in movie posters, wedding photos, and fashion shoots. It works because dark images hold attention. Your eye goes straight to the subject since nothing else competes for light.
Why People Love This Style
Moody photos feel more emotional and more polished. This style hides a busy background in shadow, makes skin and light areas stand out, and feels cinematic, like a still from a film. It also works on almost any subject: portraits, weddings, landscapes, even food.
Step by Step: Editing in Lightroom
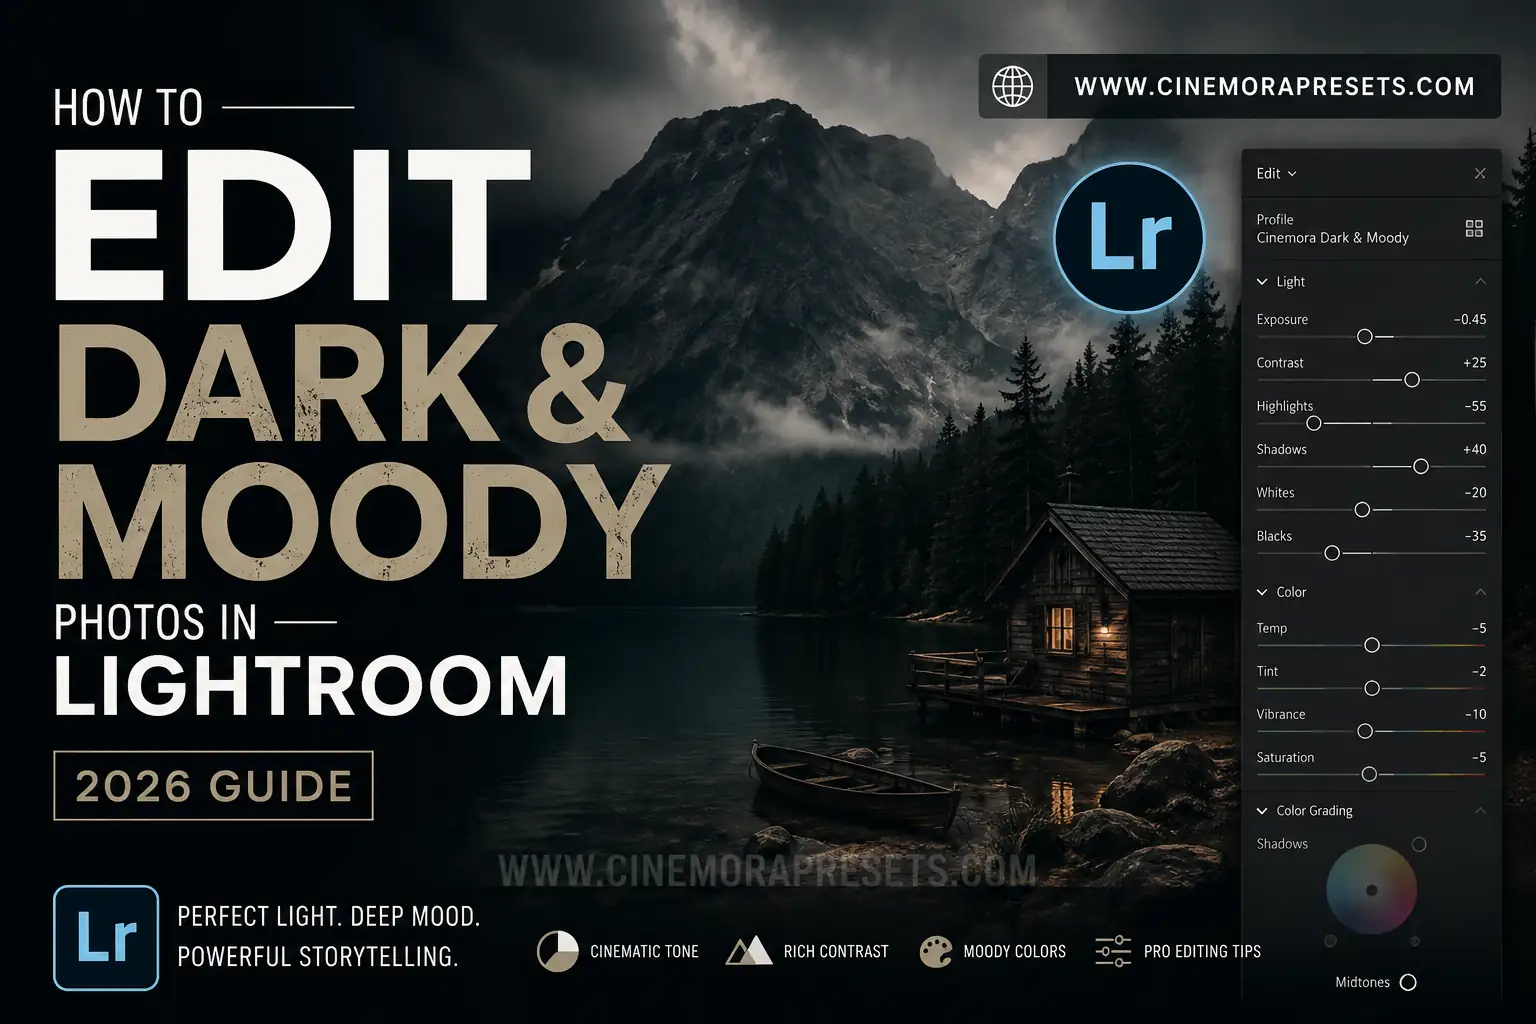
Step 1. Lower the Exposure
Start in the Basic panel. Drop Exposure a little, around -0.5 to -1.0. Then add some Contrast (+20 to +30) to give the photo more punch. Pull Highlights down (-60 to -80) so nothing looks too bright, and bring Shadows down (-30 to -50) to start building the mood.
Be careful with Blacks. Crush them a bit (-30 to -50), but check your histogram. If it is jammed against the left wall, you have gone too far and lost detail.
Step 2. Shape the Tone Curve
This is the real secret to the moody look. Open the Tone Curve and do this:
- Lift the bottom left point a little, so black becomes a soft dark gray instead of pure black. This is called a matte fade.
- Add a point near the lower left area and pull it down slightly to keep shadows rich.
- Add a small point in the middle and nudge it up just a touch, so skin and midtones stay readable.
- Pull the upper right area down slightly so highlights never get too bright.
- Lower the top right point a bit too. This softens the whole image and gives it a filmic feel.
You should end up with a gentle S shape that is steep in the shadows and soft in the highlights.
Step 3. Tone Down the Colors
Open the HSL panel. Bright colors break the moody feeling, so pull back saturation on greens, yellows, and reds a little. Keep oranges close to normal so skin still looks natural. Then raise the luminance on orange slightly, so skin glows a bit against the darker background. You can lower blue luminance too, which deepens skies and shadows.
Step 4. Color Grade the Shadows
Go to Color Grading. Add a small amount of cool blue or teal into the shadows. Add a touch of warm tone into the midtones and highlights. This warm and cool mix is what gives moody photos that rich, three-dimensional feeling. Keep the amounts small. A little goes a long way.
Step 5. Final Touches
Finish with a small vignette so the edges fade into shadow, a touch of grain for a film-like texture, and careful sharpening. Use the Masking slider (hold Alt or Option while sliding it) so only edges and details get sharpened, keeping the smooth shadow areas clean.
Common Mistakes to Avoid
Crushing the blacks too hard loses all shadow detail and just looks like a black hole, not moody. Removing all the color makes the photo feel flat, so keep a little warmth in the skin and a little cool in the shadows. Skipping white balance can make the photo feel cold, so a slightly warm setting helps. And sharpening the whole image makes shadows look grainy, so mask your sharpening to edges and details only.
Quick Answers
Fastest way to get this look?
Lift the blacks and lower the highlights in the Tone Curve, then add a cool tone to the shadows in Color Grading.
Does this work on bright photos?
Yes, but lower Exposure and Highlights more than usual since the photo started bright.
How do I keep skin tones natural?
Raise Orange Luminance slightly and avoid pushing too much blue or green saturation down.
Final Thoughts
Dark and moody editing is not about dragging every slider down and hoping it looks good. It is about control. Lift your blacks slightly for a matte feel, keep a little color tension between warm and cool tones, and always protect detail in your shadows. Once you get the balance right, even a flat, boring photo can turn into something that feels rich and cinematic.