TL;DR: To install XMP Lightroom presets, open Lightroom on any device, navigate to the Presets panel, and import your .xmp files directly — no DNG workaround needed in 2026. On mobile, use the three-dot menu inside the Presets panel to import from your Files app. On desktop, go to File → Import Develop Profiles & Presets in Lightroom Classic, or use the Presets panel menu in Lightroom CC. All presets on Cinemora Presets are 100% free — no sign-up required.
What Are XMP Lightroom Presets?
An XMP Lightroom preset is a small metadata file (with the .xmp extension) that stores a complete set of Lightroom develop settings — exposure, white balance, tone curve, color grading, HSL adjustments, and more — so you can apply a specific editing look to any photo with a single tap or click. XMP is the same metadata standard used to store EXIF and camera data inside your photos — you can explore what's embedded in any image with our Image Metadata Viewer.
If you've been editing photos for a while, you might remember the old .lrtemplate format or the DNG-based workaround that mobile users had to deal with for years. Adobe has been steadily moving toward XMP as the universal preset format since Lightroom Classic 7.3, and by 2026, it's the standard across every version of Lightroom. I personally found the transition a bit confusing at first, but once I understood how XMP files work, my preset workflow became dramatically faster.
Why XMP Replaced DNG for Presets
The DNG method was never a true "preset import" — it was a workaround. You'd open a pre-edited DNG photo in Lightroom Mobile, copy its settings, and paste them onto other images. It worked, but it was clunky, slow, and confusing for beginners.
XMP files changed everything. They're lightweight (usually under 10KB), they contain only the editing instructions without an embedded photo, and they import directly into Lightroom's Presets panel on every platform. In my experience, switching from DNG-based presets to XMP cut my preset management time in half.
Why XMP Presets Matter for Your Workflow
Here's why I recommend XMP presets to every photographer I work with:
- Universal compatibility — the same .xmp file works on Lightroom Mobile, Lightroom CC, and Lightroom Classic
- Cloud sync — presets sync across all your devices through Adobe Creative Cloud
- Lightweight files — a single XMP preset is typically 5–10KB versus a 20–40MB DNG file
- Direct import — no copy-paste workaround, just a clean import into your Presets panel
- Easy organization — you can create preset groups and folders to keep everything tidy
How to Install XMP Presets on iPhone and iPad (Lightroom Mobile iOS)
When I first tried installing presets on my iPhone, I made every mistake possible. I downloaded the wrong file type, tried to open XMP files directly, and even emailed presets to myself hoping Lightroom would detect them. Let me save you the headaches — here's the exact process that works every time.
Step 1: Download Your Free XMP Files
Download your preset pack from Cinemora Presets to your iPhone or iPad. All presets are completely free — no account needed. If the presets come in a .zip file, tap the .zip file in the Files app and it will automatically create an unzipped folder with your .xmp files inside.
Step 2: Open Lightroom Mobile
Launch the Lightroom app on your iPhone or iPad. Open any photo from your library — you need to be in the editing view for the next steps to work.
Step 3: Navigate to the Presets Panel
Tap Presets at the bottom of the editing screen. You'll see your existing preset groups listed here.
Step 4: Import the XMP Files
Tap the three-dot menu icon (⋯) at the top of the Presets panel and select Import Presets. This will open the iOS Files app. Navigate to the folder where you saved your .xmp files, select them, and tap Open.
Step 5: Apply and Fine-Tune
Your new presets will appear in a new group inside the Presets panel. Tap any preset to apply it to your photo, then adjust the intensity by tweaking individual sliders if needed. I personally recommend always checking the exposure and white balance after applying a preset, since every photo has different lighting.
Watch: How to Import Presets on Mobile
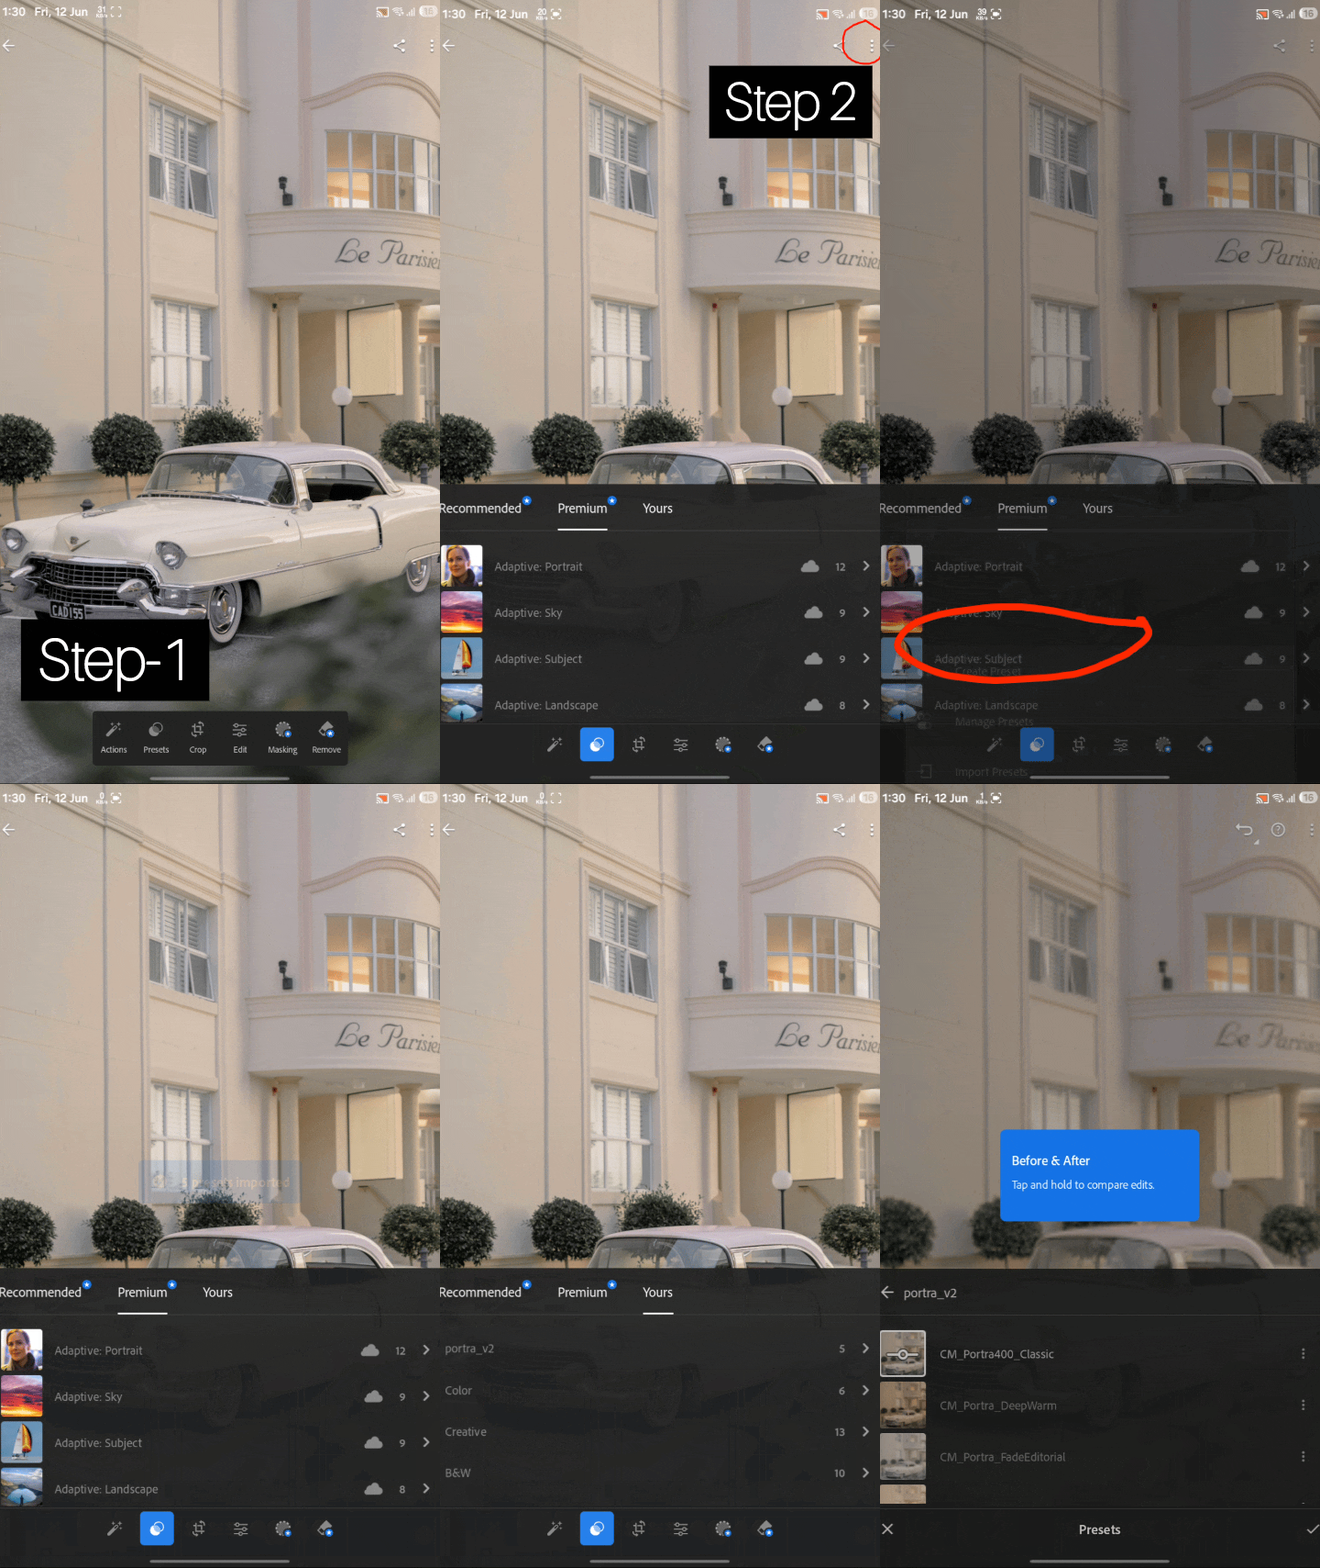
Here's a quick visual walkthrough showing the entire import process on a phone — from downloading the preset file to applying it in Lightroom Mobile:
How to Install XMP Presets on Android (Lightroom Mobile Android)
The Android process is nearly identical to iOS, but there are a couple of Android-specific details worth knowing. I've tested this on Samsung, Pixel, and OnePlus devices — the steps are consistent across all of them.
Step 1: Download and Extract
Download your preset .zip file from Cinemora Presets (free, no sign-up) and extract it using your phone's built-in file manager or an app like ZArchiver. Make sure you can see the individual .xmp files in your file manager before proceeding.
Step 2: Open Lightroom and Enter Editing Mode
Open Lightroom Mobile, select any photo, and tap to enter the editing view.
Step 3: Open the Presets Panel
Tap Presets at the bottom of the editing toolbar. You'll see the familiar preset groups.
Step 4: Import Presets
Tap the three-dot menu (⋮) at the top-right of the Presets panel and choose Import Presets. Your device's file browser will open — navigate to your extracted .xmp files, select them, and confirm.
Step 5: Verify and Organize
Once imported, scroll through the Presets panel to find your new presets. They'll appear in a group based on their original folder name. I usually rename my preset groups right away so I can find them quickly during a fast-paced editing session.
How to Install XMP Presets on Windows PC (Lightroom Classic & Lightroom CC)
Desktop installation is where things get really smooth. Both Lightroom Classic and Lightroom CC handle XMP imports beautifully, but the process is slightly different for each.
Lightroom Classic (Windows)
- Open Lightroom Classic and switch to the Develop module
- Go to File → Import Develop Profiles & Presets
- Navigate to your .xmp files or the folder containing them
- Select the files and click Import
- Your presets will appear in the Presets panel on the left side of the Develop module
Pro tip: if you select a folder instead of individual files, Lightroom Classic will import every .xmp file in that folder and its subfolders. This is a huge time-saver when you're importing a large preset pack.
Lightroom CC (Windows)
- Open Lightroom CC and select any photo to edit
- Click the Presets icon in the right panel (or press Shift + P)
- Click the three-dot menu at the top of the Presets panel
- Select Import Presets
- Browse to your .xmp files and click Import
In my workflow, I prefer using Lightroom Classic for bulk preset management because the Develop module gives me more control. But if you're a Lightroom CC user, the import process is just as reliable.
How to Install XMP Presets on Mac
The Mac process mirrors Windows almost exactly, with the usual macOS interface differences.
Lightroom Classic (Mac)
- Open Lightroom Classic and go to the Develop module
- Click File → Import Develop Profiles & Presets from the menu bar
- Use Finder to locate your .xmp preset files
- Select them and click Import
- Find your new presets in the left-side Presets panel
Lightroom CC (Mac)
- Open Lightroom CC and enter the editing view on any photo
- Open the Presets panel from the right sidebar
- Click the three-dot menu and choose Import Presets
- Select your .xmp files in Finder and click Import
One thing I've noticed on macOS — if you download presets through Safari, they sometimes end up in the Downloads folder as a .zip file that macOS automatically extracts. Check both the .zip and the extracted folder to make sure you're importing the actual .xmp files, not the archive.
XMP vs DNG vs LRTEMPLATE: Preset Format Comparison
I get asked about preset formats all the time. Here's a breakdown of how they compare:
| Feature | XMP | DNG | LRTEMPLATE |
|---|---|---|---|
| File size | 5–10 KB | 20–40 MB | 5–15 KB |
| Direct import in Lightroom Mobile | ✅ Yes | ❌ No (copy/paste workaround) | ❌ No |
| Direct import in Lightroom Classic | ✅ Yes | ❌ No | ✅ Yes (legacy) |
| Cloud sync across devices | ✅ Yes | ❌ No | ❌ No |
| Contains embedded photo | ❌ No | ✅ Yes | ❌ No |
| Supported in 2026 | ✅ Fully | ⚠️ Limited | ⚠️ Legacy only |
| Easy to organize into groups | ✅ Yes | ❌ No | ✅ Yes |
| Works without Lightroom subscription | ❌ No | ✅ Free app (limited) | ❌ No |
The bottom line: if you're downloading free Lightroom presets in 2026, always look for XMP format. It's the only format that gives you full cross-platform compatibility, cloud syncing, and direct import on every device.
Common Mistakes When Installing Lightroom Presets
After helping hundreds of photographers set up their presets, I've seen the same mistakes come up repeatedly. Here's what to watch out for:
1. Trying to Open XMP Files Directly
XMP files aren't photos — you can't double-click them and expect Lightroom to apply them. They need to be imported through Lightroom's Presets panel. If you try to open an .xmp file directly, your computer might open it in a text editor instead.
2. Importing in the Wrong Module (Lightroom Classic)
In Lightroom Classic, the "Import Develop Profiles & Presets" option only appears under the File menu. Some people try to use the regular Import button in the Library module, which is for importing photos — not presets. Make sure you're in the Develop module.
3. Not Extracting the ZIP File First
Many preset packs are delivered as .zip archives. You need to extract the .zip file first to access the .xmp files inside. Trying to import a .zip file directly into Lightroom won't work.
4. Using Outdated DNG Presets on Newer Lightroom Versions
If someone sends you presets as DNG files and tells you to "copy and paste the settings," they're using an outdated method. While it technically still works on Lightroom Mobile, you lose the ability to save the preset permanently, organize it into groups, and sync it across devices. Always ask for the XMP version.
5. Forgetting to Check Preset Compatibility
Some older presets were built with process versions that don't match your current Lightroom version. If a preset looks wildly different from the preview, check whether it needs a process version update. Go to Settings → Process in the Develop module and make sure it's set to the latest version.
Frequently Asked Questions
Are Cinemora Presets free to download?
Yes — every preset on Cinemora Presets is 100% free. No email, no account, no paywall. Just download and install.
Can I install XMP presets on Lightroom Mobile without a paid subscription?
Lightroom Mobile's free version supports basic editing but does not allow XMP preset imports. You need an active Adobe Creative Cloud subscription (Photography Plan or higher) to import and use XMP presets on mobile.
How do I add XMP presets to Lightroom Mobile?
Open Lightroom Mobile, tap into any photo, go to the Presets panel, tap the three-dot menu and select Import Presets. Navigate to your .xmp files in the Files app and tap Open. See the full iPhone and Android steps above.
How do I download Lightroom presets to my phone?
Download the preset ZIP file from Cinemora Presets directly on your phone. Open the Files app, find the ZIP in your Downloads folder, and tap it to extract. You'll then have .xmp files ready to import into Lightroom Mobile.
What is an XMP file in Lightroom?
An XMP file is a small text-based file that stores Lightroom editing settings — things like exposure, color grading, tone curve, and HSL. When you import one into Lightroom, it appears as a one-click preset in your Presets panel.
Do XMP presets work on both RAW and JPEG photos?
Yes, XMP presets apply to both RAW and JPEG files in Lightroom. RAW files generally produce better results because they contain more color and exposure data for the preset adjustments to work with.
How do I transfer Lightroom presets from my phone to my computer?
Enable Adobe Creative Cloud sync in Lightroom Mobile settings. Once synced, presets you import on your phone automatically appear in Lightroom CC on your desktop. For Lightroom Classic, you may need to re-import them manually.
Why do my imported presets look different from the preview photos?
Preset previews are typically shot under specific lighting conditions and may include additional manual edits beyond the preset itself. Differences in your original photo's exposure, white balance, and lighting will cause the preset to render differently.
Where are XMP presets stored on my computer after importing?
On Windows, Lightroom Classic stores XMP presets in C:\Users\[YourName]\AppData\Roaming\Adobe\CameraRaw\Settings. On Mac, they're in ~/Library/Application Support/Adobe/CameraRaw/Settings. Lightroom CC stores them in its own cloud-synced database.
How do I install a Lightroom preset on my laptop?
Open Lightroom Classic, go to the Develop module, then File → Import Develop Profiles & Presets. Select your .xmp files and click Import. In Lightroom CC, open the Presets panel, click the three-dot menu, and choose Import Presets.
Conclusion
Installing free XMP Lightroom presets is genuinely straightforward once you know the exact steps for your device. Whether you're editing on your iPhone during a commute, batch-processing on your Windows desktop, or fine-tuning on a MacBook at a coffee shop, the process comes down to the same core action: open the Presets panel, tap or click import, and select your .xmp files.
If you're looking for free cinematic XMP presets to get started, check out the Cinemora Presets collection — every pack is free, delivered in XMP format, and works on all devices. Want to take your edits further? Check out our guide on building a cinematic editing workflow using tone curves and advanced color grading. Happy editing!